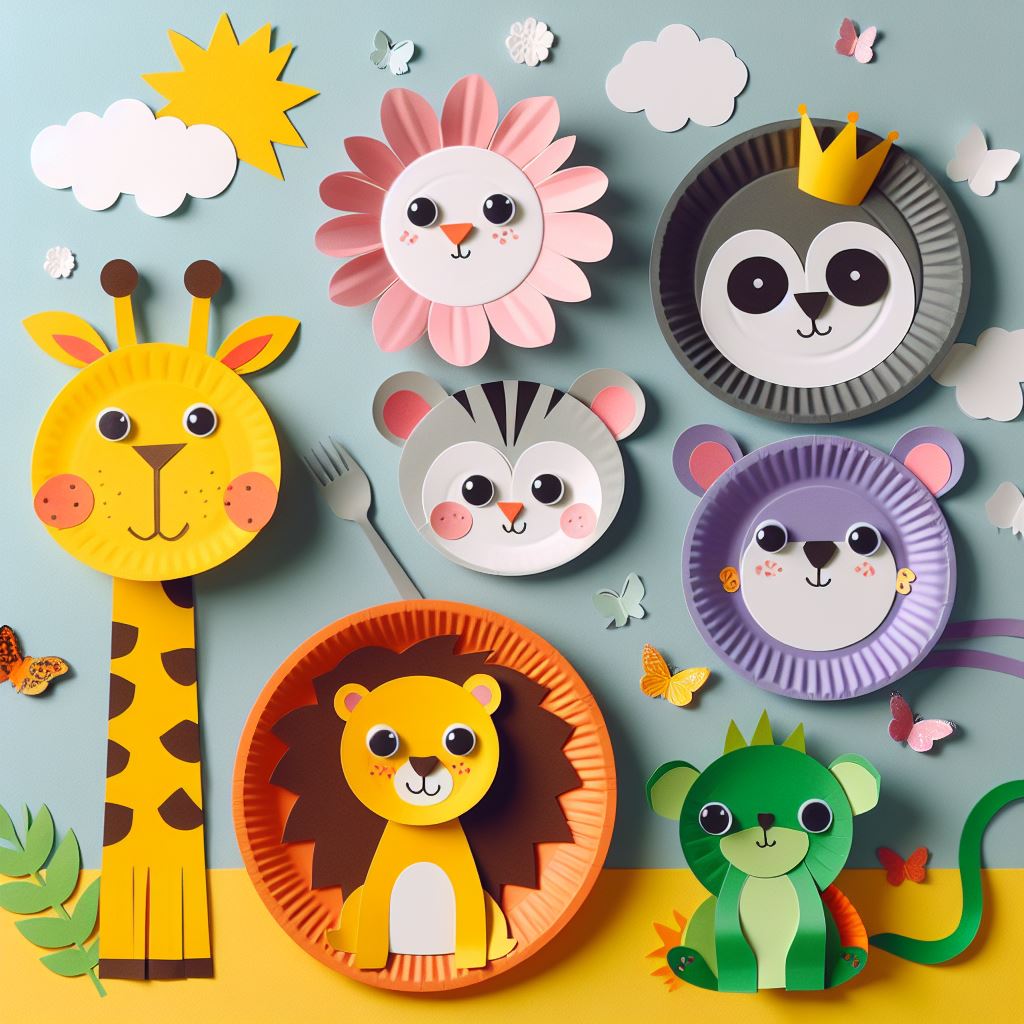
Hey there, crafty moms and dads! Are you looking for a fun project to keep the little ones busy on a rainy summer day? Look no further than your recycling bin. Those flimsy paper plates you used for last week’s barbecue are about to become the star of an animal adventure. With some construction paper, paint, glue, and a few other basic supplies, you’ll have a zoo’s worth of creatures in no time. Lions and tigers and bears – oh my! Not to mention elephants, giraffes, monkeys and more. Let the kids’ imaginations run wild. Before you know it, your dining room table will transform into a jungle, savannah or ocean scene. The best part is, once your wild things start to look a bit worn, just throw them in the recycling with the plates you used to make them. An eco-friendly craft project the kids will never forget! The paper plate zoo awaits…
Introducing Paper Plate Crafts for Kids
Paper plate crafts are an easy, budget-friendly activity for kids of all ages. All you need are plain white paper plates, some paint or markers, glue, and bits of fabric, paper, or craft supplies. The possibilities are endless!
Animals
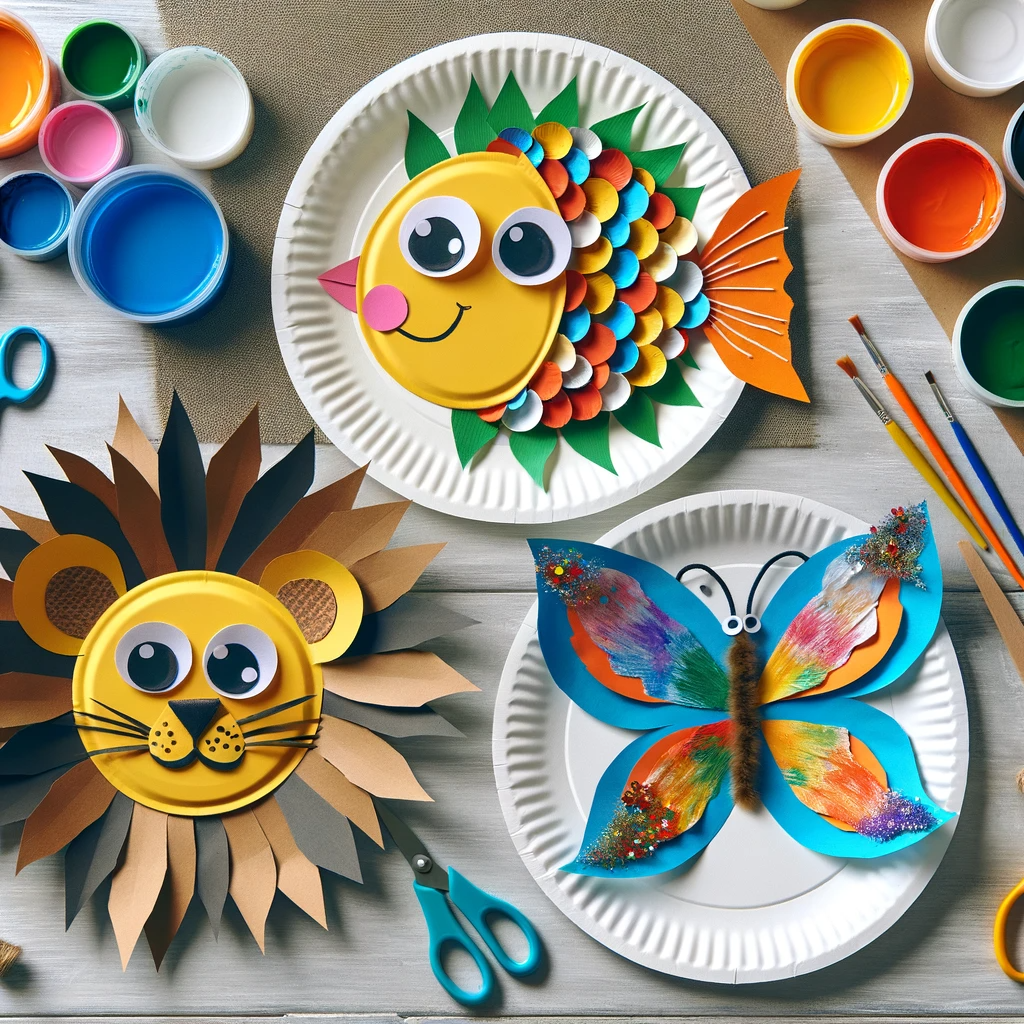
One of the most popular paper plate crafts for kids are animals. Have your child paint a paper plate, then add details to turn it into their favorite animal. For example:
- A lion: Paint the plate yellow, let dry, then glue on a mane made from brown fabric or paper and add a face.
- A fish: Paint the plate blue or green, cut out a fish shape, then glue on scales made from foil, paper, or craft sticks and an eye.
- A butterfly: Paint the plate, let dry, then glue on pipe cleaner or craft sticks for the body and wings. Add designs with paint, stickers or tissue paper.
Other animal options include turtles, owls, sharks, frogs or elephants. Let your child be as creative as they like! The results can be simple or elaborate.
Masks
Another fun use of paper plates is to turn them into masks. Have your child cut out eye holes, then decorate the plate with paint, stickers, glitter, feathers and more to make their own unique mask. They can pretend to be animals, superheroes or princesses. This open-ended craft stimulates imagination and creativity.
With some paint, glue, and basic craft supplies, humble paper plates can be transformed into all sorts of animals, masks and more. And the best part? Your child will have a memento of their creativity to enjoy for years to come.
Supplies You’ll Need for Paper Plate Animal Crafts
To make your paper plate animals come to life, you’ll need a few basic supplies.
Paper plates
Of course, you’ll need paper plates! Round ones work best for most animals. Pick up a pack of white paper plates in different sizes for smaller and larger creatures.
Paint and brushes
Tempera paint, acrylic paint, or watercolors along with brushes in various sizes will allow kids to decorate their plates however they like. They can paint the whole plate or just add details. Consider washable paints, especially for younger kids.
Googly eyes
No paper plate animal is complete without googly eyes! Look for packs that contain different sized eyes so you have options for your animals. Glue dots or tacky glue work well for attaching the eyes.
Yarn or string
Yarn, string, or twine can be used for tails, manes, whiskers and more. Provide lengths of different thickness, colors and textures.
Miscellaneous
Don’t forget things like construction paper, glue, scissors, tape, cotton balls, pipe cleaners and craft sticks. These extras will allow kids to add ears, tails, feet, teeth and other embellishments to bring their creatures to life.
With some basic craft supplies and a little imagination, kids can create an entire paper plate zoo of animals. Set everything out, put on some music and let the creativity flow! The results are sure to be wildly fun.
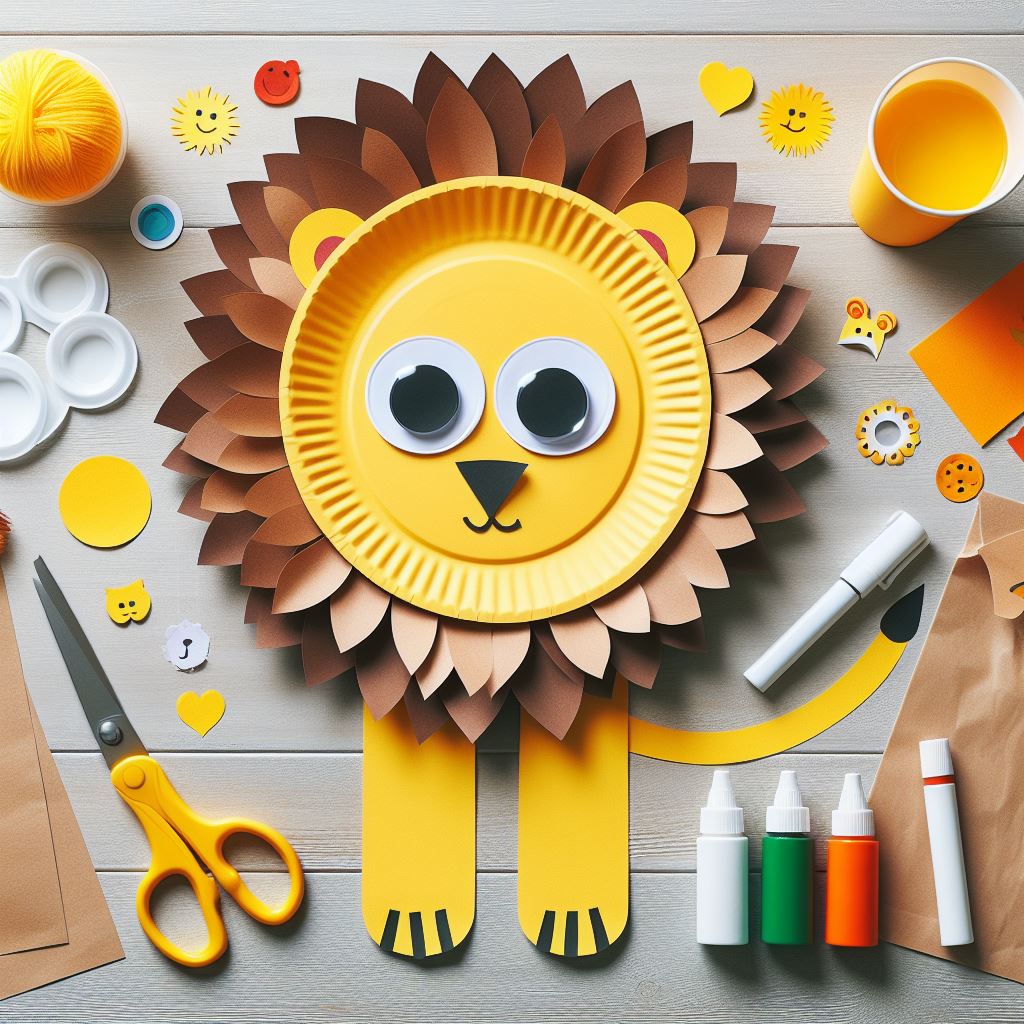
Step-by-Step Instructions to Make a Cute Paper Plate Lion
To make a cute paper plate lion, gather the following supplies:
- Yellow paper plates
- Brown paper bags
- Googly eyes
- Yellow and orange tissue paper
- Glue
- Scissors
- Markers, stickers, or paint (optional)
Making the Lions Face
- Cut a circular hole in the center of one paper plate to make the lion’s mane. Glue the plate onto the back of a second plate so the mane stands up.
- Glue the googly eyes onto the front plate and draw a nose with a marker. You can also glue on an oval sticker or felt shape for the nose.
- Cut triangular shapes from the brown paper bags to make ears. Glue the ears onto the back of the mane plate, positioning them so they stick up.
- Use markers, stickers or paint to add details like whiskers, a mouth, eyebrows, or spots. Get creative!
Making the Lion’s Mane
- Cut strips of yellow and orange tissue paper, about 1 to 2 inches wide and 6 to 8 inches long.
- Take 2-3 strips at a time and pinch them together at the top. Glue the pinched part onto the back of the mane around the outer edge.
- Repeat gluing more tissue paper strips around the mane until you have a full, shaggy mane. Use both yellow and orange for a natural two-toned look.
- Fluff and shape the mane with your fingers so it looks natural. Add a final trim if needed.
- Display your colorful paper plate lions! They make a great zoo of homemade stuffed animals. Kids will have fun creating an entire jungle menagerie.
Your little ones can let their creativity roar by crafting this simple paper plate lion. By following these easy steps, kids of all ages can make their very own lion mane out of paper plates, tissue paper and a few other supplies. This engaging craft is a fun way for children to learn and stimulate their imagination. Enjoy your paper plate zoo!
How to Create an Adorable Paper Plate Elephant
The whimsical elephant is a kid favorite and an easy animal to craft using paper plates. Here’s how to make an adorable paper plate elephant:
Supplies
You’ll need:
- Two sturdy paper plates (the heavier the better)
- Gray paint
- Black paint or marker
- Pink construction paper
- Glue
- Scissors
- String or ribbon
Paint the Plates
Paint one paper plate gray for the elephant’s body and the other plate gray for the head. Let the paint dry completely. Once dry, use the black paint or marker to add details like eyes, ears, and a mouth. You can also add polka dots or swirls to decorate.
Make the Ears
Cut two large floppy ears from the pink construction paper. Round the tops of the ears for an authentic elephant look. Glue the ears onto the back of the head plate.
Attach the Head
Punch two holes on opposite sides of the head plate and two holes in the body plate. Thread string through the holes and tie off to attach the head to the body. Adjust the string so the head sits slightly tilted for a quizzical expression.
Add the Trunk
Cut a long gray trunk from construction paper and roll it up, securing the end with glue or tape. Glue the trunk onto the front of the head plate, just below the mouth. Curl the end of the trunk up for a playful look.
Attach the Legs
Cut four gray legs from construction paper and glue them onto the underside of the body plate, spacing them evenly apart. Bend the knees of the front legs to make it look like your elephant is walking.
Add a Tail (optional)
Cut a small gray tail from construction paper and glue it onto the back of the body plate. Fluff up the end of the tail for extra whimsy.
Your delightful paper plate elephant is now ready to join in the craft zoo fun! Kids will have a blast creating their own animal menagerie.

Craft a Playful Paper Plate Monkey
Making a paper plate monkey craft is a fun, playful project for kids. Follow these steps to create your own little zoo animal:
Gather Supplies
You’ll need:
- Brown paper plates
- Brown paper bags
- Googly eyes
- Brown felt or construction paper
- Glue
- Scissors
- Markers, crayons or paint (optional)
Make the Head
Have your child draw a monkey face on one of the paper plates. They can add ears, a mouth, nose and eyes. For a more three-dimensional effect, cut out ears from the brown felt or paper and glue them onto the plate. Add the googly eyes for a silly touch.
Create the Body
Cut a hole in the center of a second paper plate to make the body. Decorate the body plate however your child likes. You can draw on fur, a belly button or tail.
Attach the Head
Glue the head plate onto the top of the body plate, lining up the edges. Hold together for 30 seconds as the glue dries to secure in place.
Make the Arms and Legs
Cut four strips from the paper bags to make arms and legs. Fold each strip in half lengthwise and glue to form tubes. Attach the arms to the sides of the body and the legs to the bottom.
Add a Tail (Optional)
Cut a strip from a paper bag and curl it into a spiral to make a curly tail. Glue the tail onto the back of the body plate.
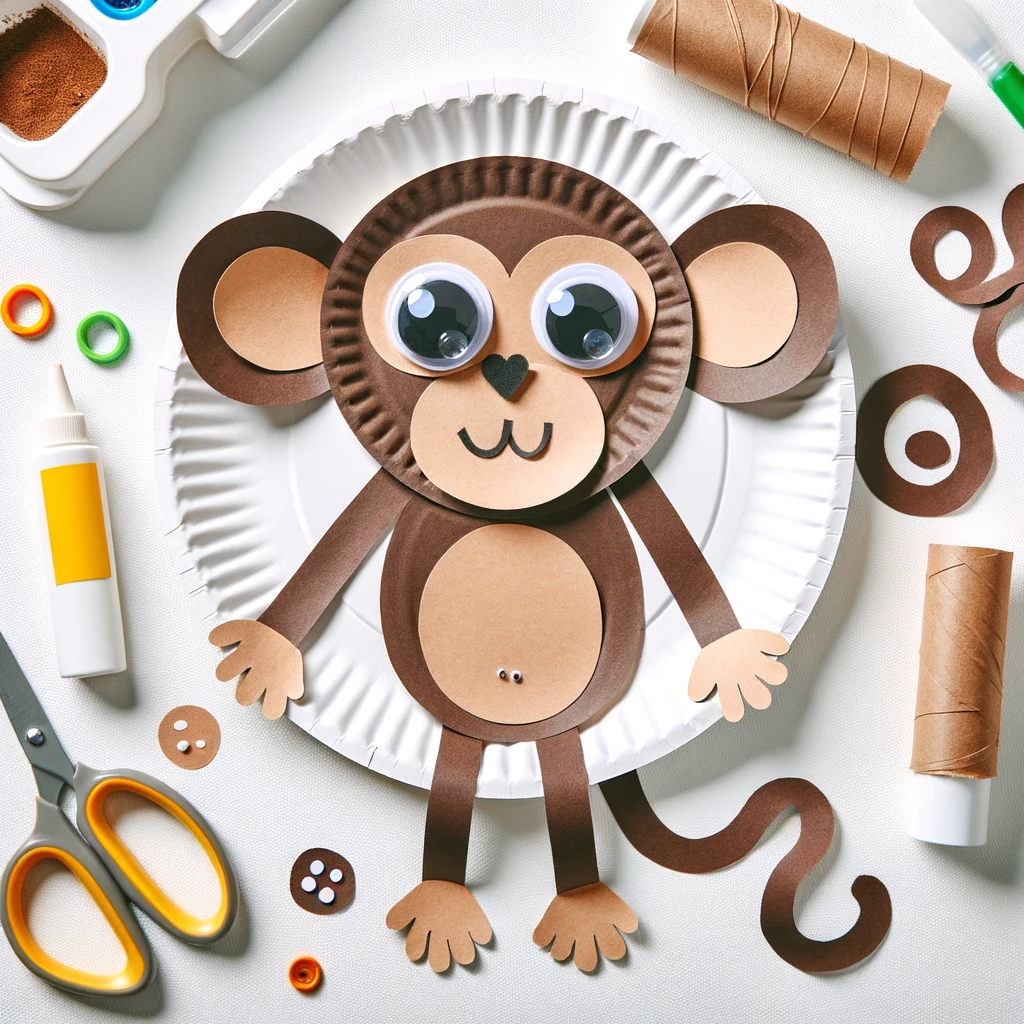
Play!
Display your paper plate monkey craft on a tabletop or shelf. Kids can make an entire zoo full of different animals like lions, zebras, giraffes and elephants using the same techniques. Have fun putting on an impromptu puppet show!
Your little monkey craft is ready to swing into action. Kids will go bananas over this fun and creative project. Have an wild time at your paper plate zoo!
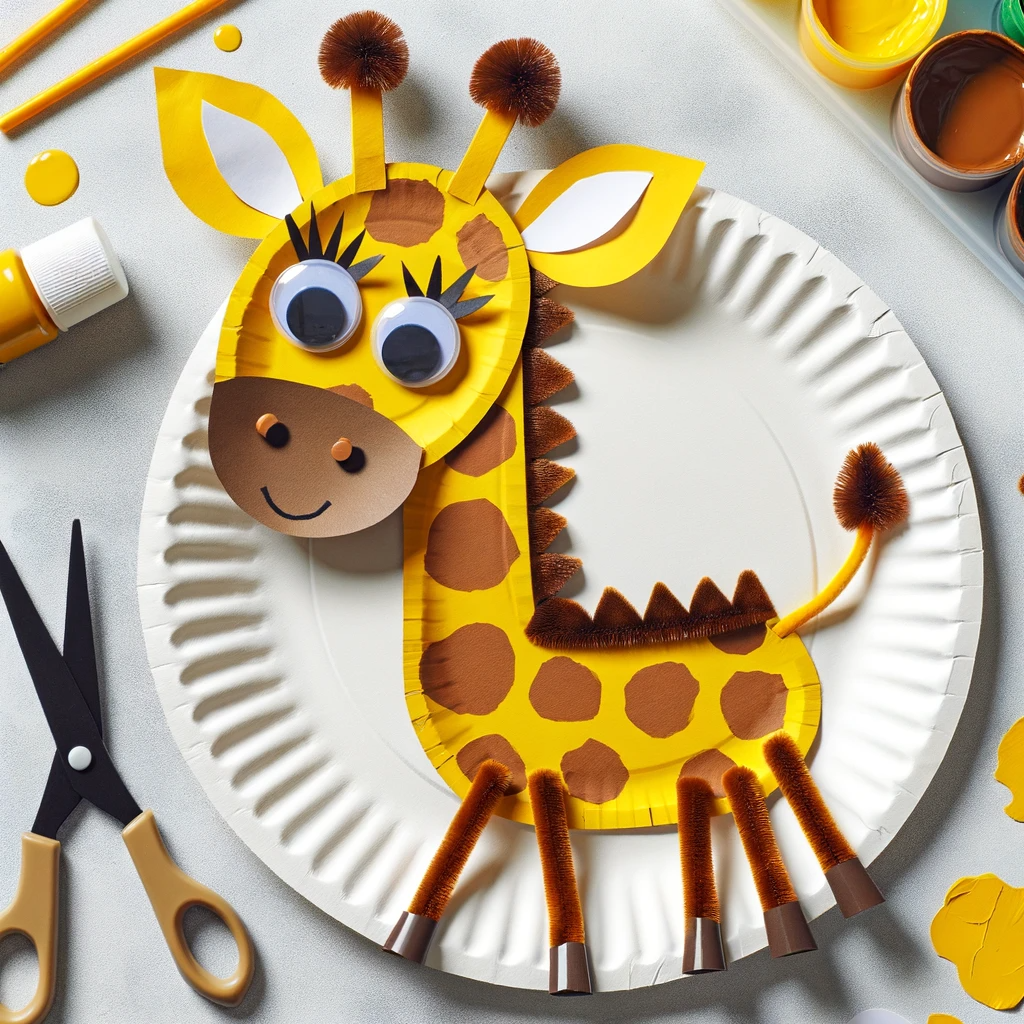
Make a Silly Paper Plate Giraffe
To make a silly giraffe paper plate craft, gather the following supplies:
- Two sturdy paper plates (not flimsy picnic plates)
- Yellow and brown tempera paint or markers
- Googly eyes
- Brown pipe cleaners
- Glue
- Scissors
Paint and Assemble the Plates
Paint one paper plate yellow and let it dry completely. This will be the giraffe’s body.
Paint brown spots on the yellow plate, or glue on small pre-cut brown paper spots. Make the spots different sizes for an authentic giraffe pattern.
For the head, paint the second plate brown and let it dry. Glue on the googly eyes and pipe cleaner eyelashes to bring your giraffe to life!
Cut a jagged-edged mane from yellow paper and glue it around the edge of the head plate. Bend the pipe cleaners into the shape of giraffe horns and attach them to the top of the head with glue.
Attach the Head
With the plates still separated, attach the head to the body. Glue the brown head plate onto the front of the yellow body plate, positioning it so the giraffe is looking forward. Let the glue dry completely.
Add the Legs
For legs, cut four brown pipe cleaners into 6-8 inch lengths. Bend one end of each pipe cleaner at a 90 degree angle to form feet. Glue the feet onto the back of the paper plate body, spacing the legs apart. Bend the legs into a galloping shape.
Your silly paper plate giraffe is ready to join the craft zoo! Kids will have fun making an entire menagerie of different animals. These whimsical crafts stimulate creativity and bring out smiles. Display them on a bulletin board or use them for imaginative play. Your little critters will charm everyone at the paper plate zoo.
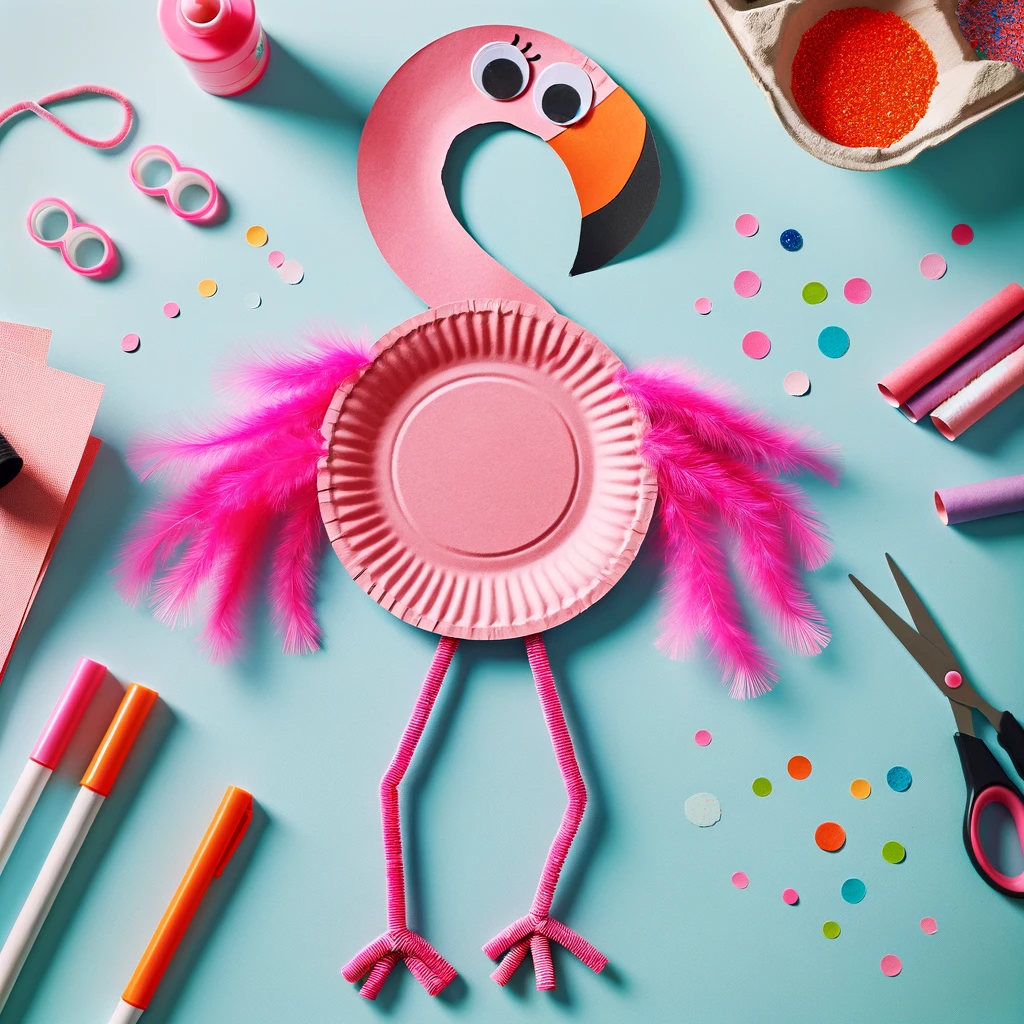
Building a Colourful Paper Plate Flamingo
Building a colourful paper plate flamingo is a fun craft project for kids. To make your own flock, here’s what you’ll need:
- Pink paper plates
- Orange felt or construction paper
- Black felt or construction paper
- Googly eyes
- Glue
- Scissors
- Pipe cleaners
- Black marker
Body
Fold one paper plate in half and cut a half moon shape to form the flamingo’s body. Open up the plate—this will be the base. Affix two pipe cleaners to the inside center of the plate to form legs. Bend the pipe cleaners at the bottom to make feet.
For the neck and head, cut an oval shape out of pink paper and attach it to one end of the plate with glue. Cut an orange triangle for the beak and glue onto the front of the head. Add googly eyes with glue for the eyes.
Use scissors to fringe the edges of the remaining pink paper plate. Gather the fringe up around the edge and affix it to the back of the body plate with glue to make fluffy feathers.
Wings
Cut two wing shapes out of pink paper and two smaller wing shapes out of black paper. Glue the pink wings onto either side of the body. Glue the black wings onto the top edge of the pink wings.
Finishing touches
Use the black marker to add details like eyelashes, eyelids, mouth, and feet. You can also draw scales on the legs and a line down the neck to represent the flamingo’s spine.
Stand your new feathered friend on its pipe cleaner legs and you have an adorable paper plate flamingo ready to join your kid’s zoo animal menagerie! These colourful lawn ornaments will delight friends and family all summer long.
Assembling a Slithery Paper Plate Snake
Assembling your slithery paper plate snake is a fun craft for kids. Follow these steps to create your own paper plate menagerie:
Materials
- Paper plates
- Scissors
- Glue (or a hot glue gun for older kids)
- Markers, stickers or paint (optional for decorating)
- Ribbon, string or pipe cleaners
Instructions
- Start with 2-3 paper plates for your snake’s body. Have the kids decorate the plates however they like – they can draw scales, use stickers or paint the plates green. Let the decorations dry if using paint.
- Cut one of the plates in half to make a head shape. Cut out eye holes or have the kids draw eyes on. They can also add a tongue, nostrils or any other facial features with markers.
- Attach the head to one end of the first body plate. Secure in place with glue or by stapling.
- Attach the remaining body plates in a line, gluing or stapling the edges together. Make sure the snake can bend and curve!
- Use the ribbon, string or pipe cleaners by gluing two pieces on either side of the first body plate to make fangs (optional). You can also glue on googly eyes for a fun effect!
- Add any final touches like a forked tongue. Give your snake a fun name and it’s ready to join the paper plate zoo!
Kids will have a blast assembling their scaly friend. Get creative with different patterns, sizes and types of paper plates. Why not make the whole zoo with lions, tigers, bears and more? A paper plate menagerie is the perfect rainy day craft to spark some wild creativity.
Paper Plate Animal Crafts FAQs: Common Questions Answered
Paper plate crafts are a fun, budget-friendly activity for kids of all ages. However, some questions often come up when tackling a paper plate zoo. Here are some of the most common FAQs answered.
What animals can we make?
The possibilities are endless! Some easy options include:
- lions, tigers and bears (oh my!)
- elephants
- giraffes
- zebras
- monkeys
- penguins
- fish
You can find tutorials online for just about any animal your child can imagine.

How many plates will we need?
That depends on how many different animals you want to make. As a general rule, you’ll need at least one plate per child for their favorite animal, maybe a few extra. Stock up on a multi-pack of plain white paper plates—you can never have too many!
What other supplies should we gather?
In addition to paper plates, you’ll want to have on hand:
•Paint, markers, stickers or colored paper to decorate the plates
•Glue, tape or staples to attach pieces
•Scissors for cutting out shapes
•Googly eyes to make the animals more lifelike (optional but fun!)
•Pipe cleaners, paper bags, cardboard tubes, felt, etc. for making tails, ears, trunks, etc.
•Reference photos of the animals you want to make
How long will this take?
The time will vary depending on the age of the children, number of animals, and level of detail, but expect at least 30-60 minutes for a simple paper plate zoo. Take breaks as needed—this is meant to be an enjoyable activity, not a chore! Let the creativity flow and don’t focus too much on perfection.
With some simple supplies and patience, you’ll have a roaring, stomping, swinging paper plate zoo in no time. The results will be wildly imaginative and something you can proudly display. Most importantly, your little ones will have a blast crafting their own animal menagerie.

[…] crafts spark curiosity about science and nature in little learners. This paper plate activity is perfect for elementary-aged kids and beyond. They can customise the plates by adding their own […]