Why This Project Matters: Making Waste Useful Again
Children around the world consume plastic-packaged products daily—juice bottles, water bottles, soda bottles. But what happens to them afterward? Most end up in landfills or oceans, taking centuries to break down. This hands-on activity turns that problem into a solution.
With just one plastic bottle and a few household items, kids can explore engineering, environmental science, and creativity while building their own self-watering smart planter—plus a few bonus rapid builds that bring fun to functional design.
By giving kids the tools to see waste as possibility, this project nurtures eco-consciousness, critical thinking, and innovation—all in just 72 hours.
What Kids Will Learn: Real Science in Real Life
This activity combines several key educational frameworks:
- Environmental Education: Understanding the impact of plastic and rethinking consumption.
- Scientific Principles: Siphoning via capillary action and photochromic responses to sunlight.
- Engineering Design: Prototyping a usable product from waste.
- Creativity and Maker Culture: Upcycling + imagination = smart sustainability.
This activity is also ideal for project-based learning (PBL) or Earth Day celebrations
3-Day Activity Plan: Turning Waste into Wonder
Day 1: Build a Self-Watering Planter
Materials Needed:
- 1 plastic bottle (500ml–1.5L)
- Cotton string (natural fibres)
- Scissors or a craft knife
- Soil and small plant or seeds
- Thumbtack or nail
- Water
- Optional: decorations like tape, stickers, or paint
Instructions:
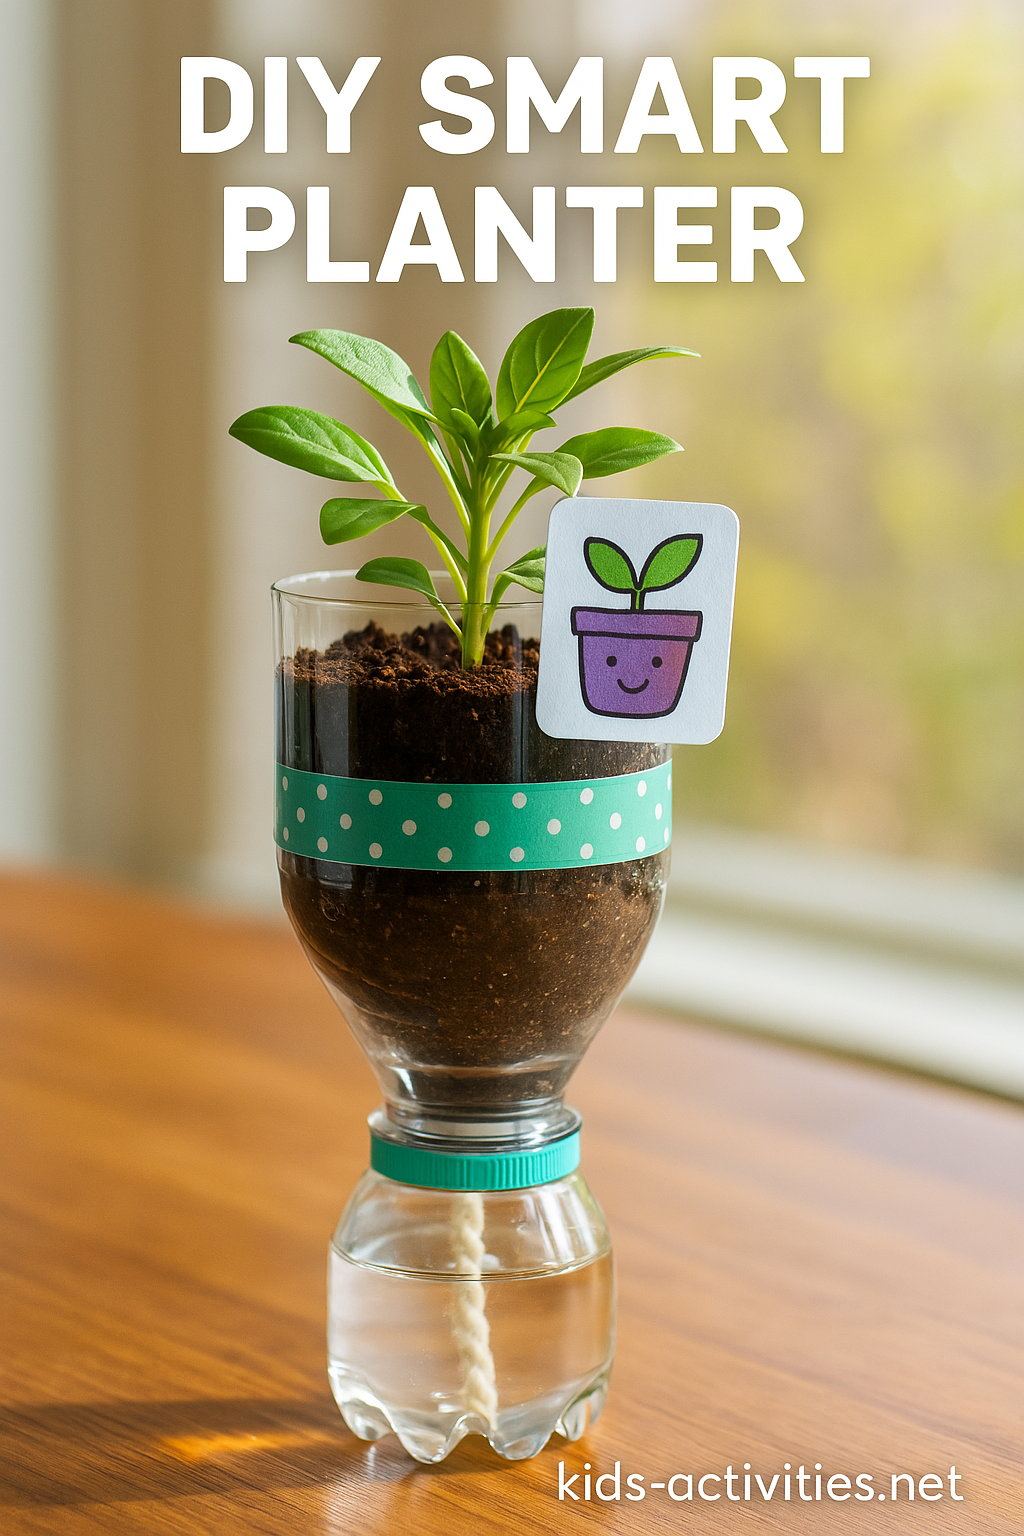
- Cut the Bottle
Slice the plastic bottle about one-third of the way down. Keep both parts. - Create the Wick
Poke a small hole in the bottle cap and pull the cotton string through. One end should dangle inside the water reservoir; the other will reach the soil. - Assemble Your Planter
Invert the top part of the bottle (with the wick and cap) into the bottom half filled with water. - Plant and Watch
Add soil and seeds or a small plant. Over time, the string will draw water upward using the capillary effect, keeping the plant moist automatically.
Science Tip: This setup mimics real-world irrigation systems using passive watering techniques—perfect for small-scale gardens.
Day 2: Make a Sunlight-Activated Plant Tag
Materials Needed:
- White paper stickers or card stock
- Photochromic nail polish (colour-changing under UV light)
- Markers or pens

Instructions:
- Design Your Label
Let kids decorate the sticker with plant names, fun characters, or mood faces. - Apply the Magic
Brush sections with UV-sensitive nail polish. - Take It Outdoors
Expose to sunlight and watch as it changes colour—visibly showing UV exposure levels!
Learning Moment: Photochromic compounds change structure in the presence of UV radiation. This visual reaction helps explain sunlight intensity and light-reactive materials.
Day 3: Quick Builds for Bonus Fun
Let kids choose one of these bonus builds to finish the 72-hour challenge with a burst of creativity.
Option 1: Bottle Cap Chess Set
- Collect 32 plastic caps (two colours).
- Draw or print mini chess icons and stick them on.
- Create an 8×8 board from cardboard or paper.
- Great for upcycling and logical thinking!
Option 2: Sonic Dust Blaster
- Cut a bottle diagonally, cover the opening with mesh or gauze.
- Tape a balloon or rubber end to the cut base.
- Press down to push air through the mesh—perfect for blowing crumbs out of keyboards.
Learning Angle: Discuss air pressure, directional airflow, and real-life applications like air purifiers and vacuum systems.
Learning Goals and Educational Takeaways
| Skill Area | Learning Outcome |
|---|---|
| Environmental Awareness | See plastic waste as a resource |
| Engineering Thinking | Build functioning tools from limited materials |
| Scientific Observation | Track watering effectiveness and UV colour changes |
| Creative Design | Combine aesthetics with function |
This activity blends environmental literacy with scientific discovery, giving kids an engaging way to practice sustainability at home.
Free Resources to Download
Plastic Bottle Smart Planter PDF Pack
- Printable step-by-step guide
- Materials checklist
- Plant tag templates
- Chess board printout
Observation Worksheet
Track your planter’s water levels and UV response over 5 days.
Eco-Inventor Badge
Let kids print, colour, and wear their own “Eco-Inventor” badge to celebrate their creation!
Visual Aids: When and Where to Use
- Main Image: Show a decorated plastic bottle planter on a windowsill, with bright leaves and a sunlit background. Label it: “DIY Smart Planter Challenge” with kids-activities.net watermark.
- Insert Image Suggestion (for Day 2):
A child holding a plant tag that changes colour in sunlight. Place directly under “Day 2: Make a Sunlight-Activated Plant Tag”.
Beyond the Bin: A Fresh Outlook on Everyday Waste
Recycling doesn’t have to stop at sorting bins. With a little creativity and curiosity, kids can transform trash into tools, and in the process, build practical science skills and environmental awareness.
This 72-hour journey—from bottle to smart planter—shows how discarded items can spark discovery. Whether it’s engineering a self-watering system, exploring the magic of UV-reactive materials, or playing chess with caps, kids will walk away not just with a finished product, but with a deeper appreciation for innovation and sustainability.
Let this project be a starting point. Who knows what other “waste” might be waiting for a second chance?

[…] The 72-Hour Plastic Bottle Revival: From Trash to Smart Planter […]
[…] The 72-Hour Plastic Bottle Revival: From Trash to Smart Planter […]
[…] The 72-Hour Plastic Bottle Revival: From Trash to Smart Planter […]
[…] The 72-Hour Plastic Bottle Revival: From Trash to Smart Planter […]