Rain in a Jar: A Magical Weather Science Experiment for Kids
Ever wondered how to teach your child about the science behind rain in a way that’s both visual and fun? Look no further than the classic but endlessly creative experiment: Rain in a Jar. This activity is more than just a cool visual—it’s a powerful science lesson disguised as play. Perfect for ages 3-10, this experiment brings cloud formation and precipitation to life right in your kitchen or classroom.
In this blog post, we’ll show you exactly how to set up the Rain in a Jar experiment, what materials you’ll need, how to explain the science behind it in kid-friendly terms, and how to extend the learning through creative variations. Plus, we’ll include tips for educators and parents to turn this into a full-blown weather science unit!
Why Science Activities Matter for Kids
Science isn’t just about memorizing facts—it’s about exploration, curiosity, and hands-on discovery. Experiments like Rain in a Jar introduce children to complex concepts like the water cycle and cloud formation in ways that feel more like playtime than classroom work.
Children who engage in early science activities:
- Develop critical thinking skills
- Learn to ask questions and solve problems
- Build vocabulary around natural phenomena
- Become comfortable with trial-and-error
Rain in a Jar provides an interactive introduction to meteorology (the study of weather) while delighting kids with colorful visuals and magical transformations.
What You’ll Need (Supplies List)
One of the best things about this experiment is how easy it is to set up. You probably have most of these items at home already!
- 1 Clear glass jar (or tall transparent cup)
- Shaving cream (unscented works best)
- Water
- Food coloring (blue is classic, but rainbow colors are fun!)
- Dropper, pipette, or teaspoon
- Small bowl for mixing colors
- Optional: Timer, notebook, crayons for drawing results

Step-by-Step Instructions: Creating Rain in a Jar
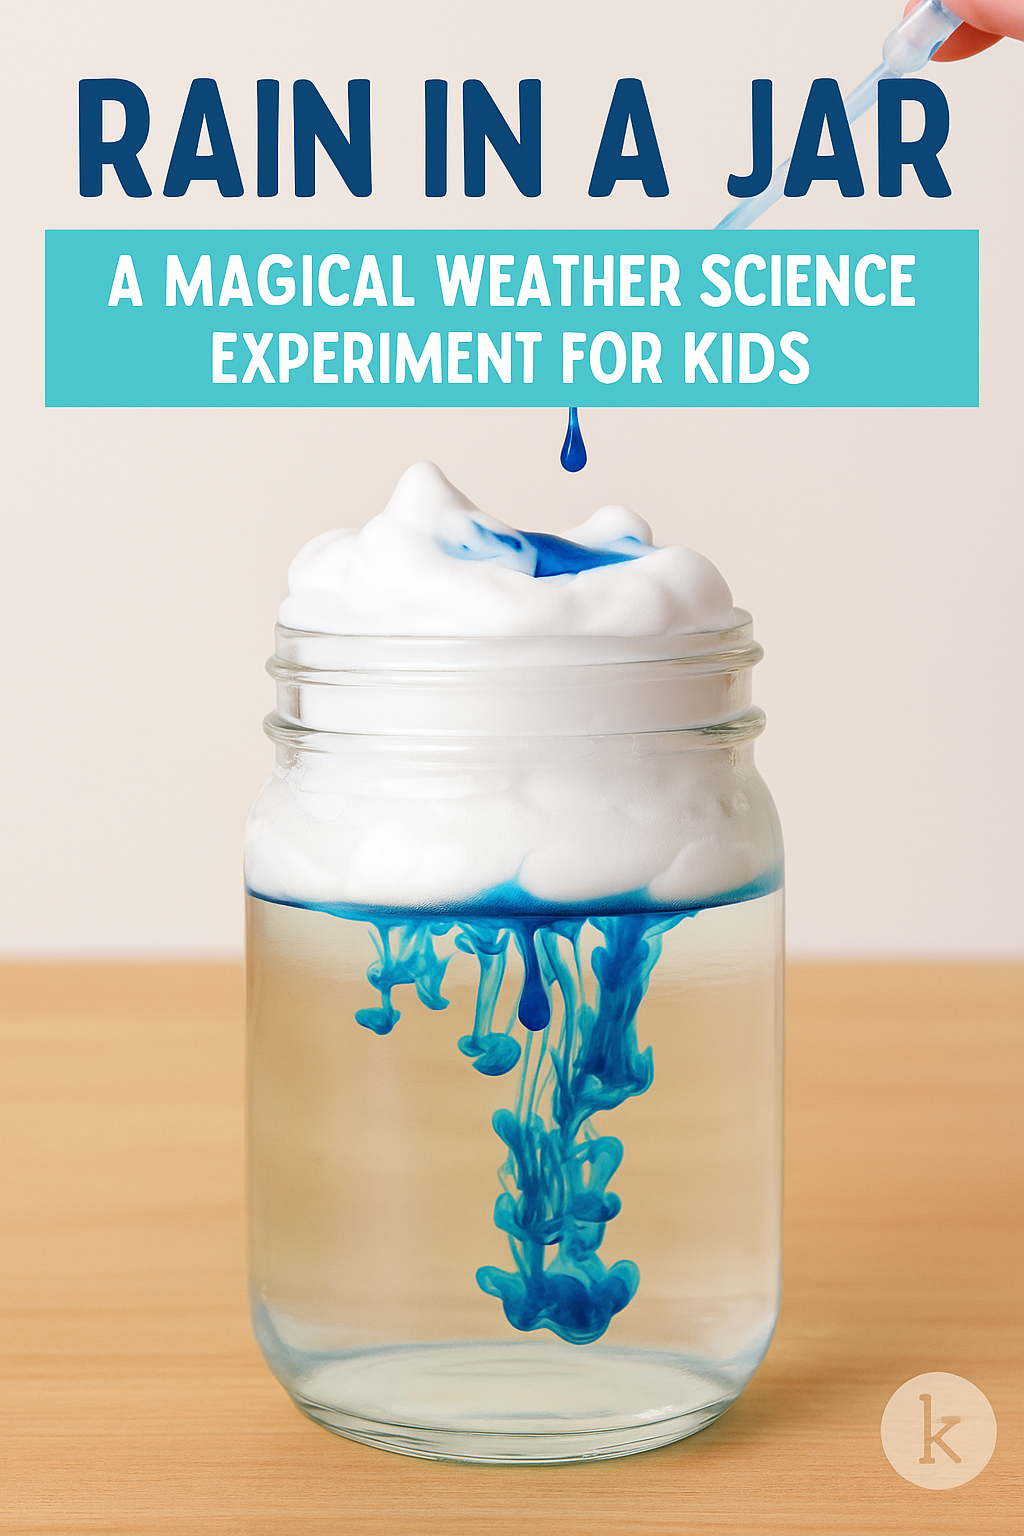
- Fill the Jar with Water
Fill your glass jar about 3/4 full with cold water. This represents the air beneath the cloud. - Add the Shaving Cream “Cloud”
Gently squirt shaving cream on top of the water until it forms a thick, fluffy cloud. Don’t overdo it—about an inch thick is perfect. - Mix Colored Water
In a separate bowl, mix a few drops of food coloring with water. You can mix different colors to observe the effects (e.g., blue + red = purple rain!). - Drop Colored Water Onto the “Cloud”
Using your dropper or spoon, slowly drip the colored water onto the shaving cream. Watch as it builds up, then eventually begins to fall through the cream into the clear water below. - Observe and Discuss
The colored water will begin to seep through like rain falling from a cloud. Ask your child what they see, and what they think is happening.
The Science Behind the Magic
This experiment demonstrates how clouds hold moisture until they become too heavy, causing rain to fall to the ground.
In simple terms for kids:
- The shaving cream is the cloud.
- The food coloring is water vapor.
- As more vapor collects, the cloud gets “heavier.”
- Eventually, it releases the water as rain—just like real clouds!
For older kids, you can introduce terms like condensation, precipitation, and saturation. Even add in the idea of how warm air rises and cools, causing water vapor to condense into clouds.
Educational Extensions & Creative Variations
Make this activity even richer with these extensions:
1. Weather Journal Activity:
Have your child draw what they saw and write a sentence or two about what happened. Add daily entries about real weather outside!
2. Experiment with Cloud Thickness:
What happens if you use more or less shaving cream? Time how long it takes for the “rain” to fall.
3. Create Rainbow Rain:
Use multiple food coloring bowls and alternate colors with each drop. Watch how they interact and swirl in the water.
4. Add Heat:
Try doing the same experiment with warm water. Does it change the speed of precipitation?
5. Compare to Real Clouds:
Look at cloud types outside and identify them. Discuss which types bring rain.
STEM Connection: Bringing the “E” and “M”
This experiment touches more than just science. Add Math by measuring the amount of food coloring drops before the rain starts. Introduce basic Engineering by challenging your kids to design their own weather model using different materials (cotton, sponges, etc.).
You’re not just doing a science project—you’re laying the groundwork for integrated STEM thinking.
Tips for Educators & Parents
- Use guiding questions: “What do you think will happen?” or “Why do you think the rain took longer this time?”
- Encourage predictions and comparisons.
- Pair with weather-themed books or songs.
- Take pictures of the process and turn it into a mini science poster or slideshow.
Rain, Wonder, and Learning
Rain in a Jar is more than just a fun indoor activity—it’s a powerful, visual introduction to weather science. It’s simple enough for preschoolers but rich enough to engage older kids in deeper learning. Whether you’re a teacher, a homeschooling parent, or just looking for a weekend project, this experiment is sure to bring a little wow into your day.
So next time your kids ask where rain comes from, you can say, “Let’s make some and find out together.”
Happy raining!


